Writing Life: Creating a Cover with GIMP (Part 2 - The Cover Image)
Step 2: Create the Cover Image
Before you begin
with your cover, take a look at any of your other covers. You are going to want
to have a feel for the styles you’ve used for a particular series, or type of
book. That style is called ‘branding’. It helps readers identify your books on
the platforms they visit.
There is
probably a whole series of blog posts you can do on branding. For now, I will
assume you know the general feel you want your books to have, and just say it
is important to retain a similar feel for your books.
As you probably
guessed from the Comment section in the Advanced Options part of creating the
image, I’ll be using the cover for the third volume of the 2014 Short Works
collection.
The first step I
take as part of creating a cover mage is to colour the background back. This
means you need to understand layers.
Each image is
made up of layers. Some layers are as big as the image, but some aren’t. The
first layer is the layer you can see when you first create the image. You will
it in the menu for layers:

When you want to
work in a particular layer, you need to make sure it is highlighted. This means
clicking on the layer. When you do this, it will turn blue, showing it has been
selected.
The first thing
I do is to use the ‘Bucket Fill Tool’ and the colour selection box to change
this layer from white to black. To do this, I click on the Bucket Fill Tool
Icon, and then I check the colour selection is correct.

In this case the
colour is not correct. So I click on the colour selection, and a small window
pops up showing the current colour.

To change the
colour, I can click on a black area in the large coloured square on the left,
or I can click on a black square in the rows of little coloured squares on the
right.

Once you have
selected the new colour, it will show up above the old colour and you can see
what change you are about to make.

When you have
selected the colour you want for the background, move your cursor over the
image. You will see a little bucket similar to the icon for the Bucket Fill
Tool. Click on the image, and the background will change to black.
Once you have
changed the background to black, you will want to position your picture in the
cover image. To do this, click on the ‘File’ tab, and select the fourth option ‘Open
as Layers’. This will open a pop-up window allowing you to select an image from
your files.

Sometimes your
chosen image will not fit your cover.

You can alter
this in one of two ways. Today, we will do it in the image you are working on,
but you might to prefer to resize it separately. That will be covered in a
future blog. For now, you will need to know four things. The first is how to
select a layer, the second is re-sizing a layer, the third is moving a layer, and
the fourth is clipping a layer to an image.
To select a
layer look at your layers dock.

Click on the
Layer you want to work in. In this case, it is named after the image I
imported, so I will click on the Lightning_dreamstime layer and it will turn
blue. In the image screen, the layer will be surrounded by a dotted yellow
line. Anything I do now, will be done to that layer. Because I want to resize
it, I click on the Scale Tool
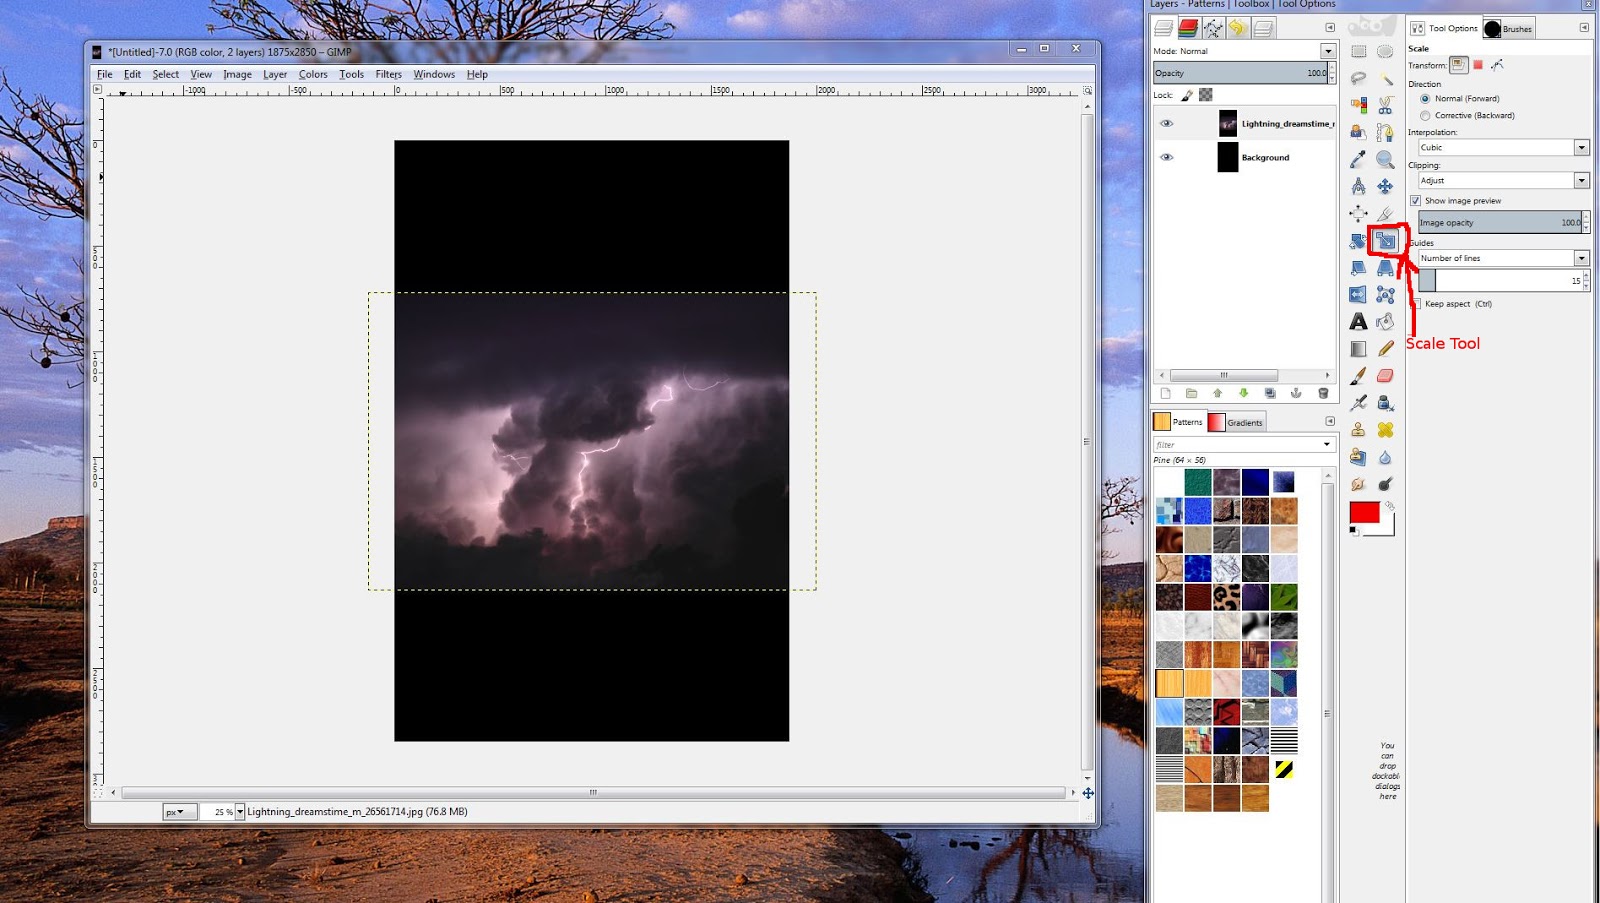
As soon as I
have made sure the right layer is highlighted and clicked on the scale tool, I
hover over the layer I want to change in main image. The cursor shows a small
picture of the scale tool icon. As soon as I click on the layer, a grid
appears, along with a small popup.

I can now scale
one of two ways:
I can place the
cursor on one of the squares hanging off the edge of the layer and stretch the
layer to fit OR I can change the numbers in the Width and Height boxes in the
pop-up. Because I want to keep the proportions of the picture I’m going to
change the numbers. This means I will first have to make sure the link symbol
beside the Height and Width number boxes is joined, since this will save me
from having to work out proportions.

Click on the
Broken Link. It will join together.
Now, because the
height of the imported image is the main problem, you need to adjust the height
measurement. Double click on the numbers in the box next to height. Click in
the Width box, but do not change anything. Since you have changed the height, you
should see the numbers in the box next to Width adjust automatically. If they
do not, click on cancel and start again, but make sure the link if joined and
not broken before you change the numbers in the box. The scale function gives
you a preview, so when you change the numbers, the layer you are trying to
scale will also change. This change is not final until you click the ‘Scale’
button at the bottom of the pop-up.

Now I want to
move my imported image so I get the part of it I want on the book cover. To do this, I have to select the ‘Move’ tool.

Move your cursor
over the main image. You will see the Move Tool icon on the end. Left click on
the layer you want to move. You will notice the yellow-dotted outline around
the layer turns white while you hold the mouse button down. If it does not,
keep trying until the correct layer is outlined. If you do not have the correct
layer outlined, you will end up moving another part of your image.
When you have
the correct layer outlined, hold the mouse button down and move the mouse. This
will move the image layer across the cover image you have created. You will see
that only the part of the layer over the cover image is shown. When you have
the part of the image you want on the cover, you will want to get rid of the
rest.

To clip the
image to your cover, you need to highlight the layer you want to snip. You do
this by clicking on that layer in the layers dock or menu. When it is blue, you
click on the Layer tab (top of the image canvas, fifth from the left).
I cannot show
the drop-down menu here, but you want the fourth option from the bottom, the ‘Layer
to Image Size’ option. When you click that the dotted line showing you the
layer will fit snugly to the image you are creating. The invisible parts of the
image will have been snipped away.
When you’re
happy with the positioning of the picture, you might want to add more images,
using layering, or you may wish to stop. For this cover, I added three more
image layers, which I won’t go into here. Basically, position your layer as you
want them to look on your cover, and then prepare to add text.
This is what my
base cover image looked like once I’d finished adding in the other images.


Comments
Post a Comment